What is a Cache Validator?
A Cache validator is defined within HTTP request and response headers and help determine if it is still valid to retrieve a file from the browser’s cache. Cache validators are important as they determine whether or not your request must be sent to the server (thus increasing load times and expending resources) or if the files can be retrieved directly from the local cache, therefore, improving load times and decreasing latency.
Retrieving previously requested resources directly from the browser’s cache is always more efficient than making a request to the server which creates additional round trips. When you specify a cache validator such as a Last-Modified or Etag header, this helps ensure browsers are taking advantage of caching as efficiently as possible.
Cache Validation Example
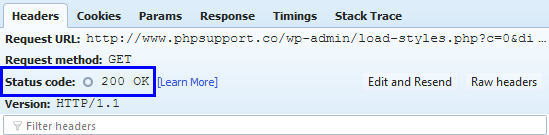
The following example shows how you can determine that cache validators are being used. The first step is to navigate to a web page and then open the developer tools window. In Chrome, this can be done by right-clicking on the page and select inspect element. Next, navigate to the Network tab and refresh the page. You will see a list of various assets that are used to create the web page. If this is the first time you are visiting the page or if you perform a hard reload on the page you will receive a 200 status code for your asset which means the request was successful.
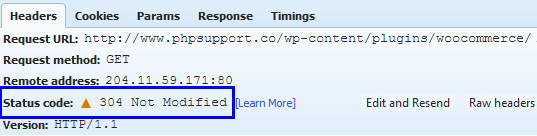
Upon reloading the same page, this asset now returns a 304 Not Modified status code as it was previously retrieved from the server and is now stored in the browser’s cache.
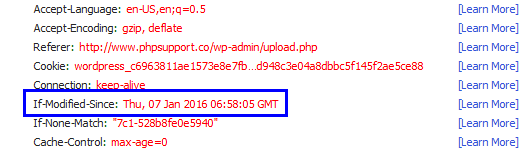
After the first request, the browser knows that the last time this file was modified was on 07 Jan 2016 06:58:05 GMT. Now on subsequent requests, the browser sends the If Modified Since HTTP Header to check if this information differs from the Last-Modified header date / time.
How to Specify a cache validator?
The first thing that is important to note about this warning is that you can only fix this for requests that are on your server. There are four different types of headers which can be utilized in different ways to fix this warning. The first two headers are last-modified and ETag. These headers help the browser determine if the file has changed since the last time it was requested. Or rather, they validate the cache. The next two headers are Cache-Control and Expires. These headers help determine how long the file should be held in cache before it fetches a new copy from the server.
1 Last-Modified Header
The last-modified header is generally sent automatically from the server. This is one header you generally won’t need to manually add. It is sent to see if the file in the browser’s cache has been modified since the last time it was requested. Here is an example below:
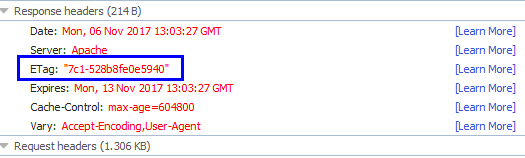
2 ETag Header
The ETag header is similar to the last-modified header. It is also used to validate the cache of a file. If you are running Apache 2.4 or higher, the ETag header is already automatically added using the FileETag directive.
The next two headers are Cache-Control and Expires. These headers help determine how long the file should be held in cache before it fetches a new copy from the server.
3 Cache-Control Header
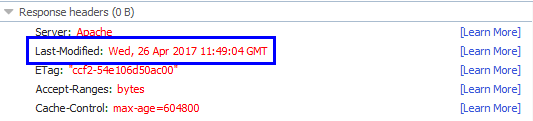
Cache-Control is a header made up of different directives which allow you to define the length of the cache. A few of the most common directives includes max-age that defines the amount of time a file should be cached for.public that allows any cache publicly to store the response.private that only cacheable by browser accessing the file.
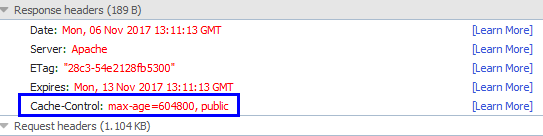
In our example above, we can see the asset is using the max-age directive. 604800 seconds would equal a cache of seven days. To configure this in Apache, simply add the following code to your .htaccess file.
Header set Cache-Control “max-age=84600, public”
</filesMatch>
To configure this in NGINX, simply add the following code to your config file. All NGINX configuration files are located in the /etc/nginx/ directory. The primary configuration file is /etc/nginx/nginx.conf.
add_header Cache-Control “public”;
}
Cache-Control headers can also be added directly in your PHP code. This example demonstrates using the PHP header to include Cache-Control setting a max-age of 1 day.
header(‘Cache-Control: max-age=84600’);
?>
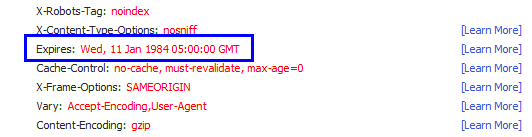
4 Expires Header
The last header is Expires header. All modern browsers support Cache-Control, hence that is all you need. However, it won’t hurt anything if you have both, but remember that only one will be used. It uses an actual date, whereas the Cache-Control header lets you specify an amount of time before expiry.
To add the Expires header in Apache, simply add the following code to the bottom of your .htaccess file. you can specify time period for the following code according to your need.
<IfModule mod_expires.c>
ExpiresActive On
ExpiresByType image/jpg “access 1 year”
ExpiresByType image/jpeg “access 1 year”
ExpiresByType image/gif “access 1 year”
ExpiresByType image/png “access 1 year”
ExpiresByType text/css “access 1 month”
ExpiresByType application/pdf “access 1 month”
ExpiresByType application/javascript “access 1 month”
ExpiresByType application/x-javascript “access 1 month”
ExpiresByType application/x-shockwave-flash “access 1 month”
ExpiresByType image/x-icon “access 1 year”
ExpiresDefault “access 7 days”
</IfModule>
## EXPIRES HEADER CACHING ##

[…] 29.Specify a Cache Validator: If you are seeing the “Specify a cache validator” warning on your website. This is due to missing HTTP caching headers which should be included on every origin server response, as they both validate and set the length of the cache. If the headers aren’t found, it will generate a new request for the resource every time, which increases the load on your server. Utilizing caching headers ensures that subsequent requests don’t have to be loaded from the server, thus saving bandwidth and improving performance for the user. For more about cache validator click here – How to specify a cache validator for a webpage in PHP […]